Archive for PC

Bitcoin – Five Ws, and one H

Bitcoin-Logo-640x480


I recently got into Bitcoin, and it’s been capturing my attention. As the web is, full of “Bitcoin 101” posts, I thought for this piece I’d touch on some of the more interesting stuff. But, quickly, a short primer.


Bitcoin: What / Who / Where / When / Why / How

What is it – digital money.

Who created it – seriously, nobody knows!

Where do you use it – anywhere that accepts it.

When do you use it – when traditional financial systems get in your way.

Why use it – because a traditional financial system got in your way once.

How do you get it – from someone who has it.


With that out of the way… Bitcoin was created because someone was sick of dealing with banks and their fees. Exchange rates. Fear of hyper inflation. Central bankers seemingly reckless and authoritarian rule. To name a few.

The dream was a new monetary system, that was basically the opposite of the present system. Bitcoin had to be owned by the people who used it. There is no central bank. No one guy who calls the shots. Really, what this means, is that someone can’t decide to print more money.

Remember when the US decided to move away from the gold standard? Inflation was suddenly relevant.

Cumulative_Inflation_1913-2015

Bitcoin was designed to mimic a precious metal. Precisely so inflation was not a thing. In fact, it was designed to be deflationary. Just like a meal is. Like gold for example, where there is a finite amount on the planet, there is a finite amount of Bitcoin. 21 million coins to be exact. And just like mining for gold, the process of issuing new bitcoins into the domain is also called mining. Another interesting fact about gold, is that can be lost forever. Like when a pirate buries a chest and his parrot eats the treasure map. You could then say, arrrrr, I mean… you could say that the total amount of gold in the world went down, thus driving prices up. Supply and demand. The same thing is possible with bitcoin. Someone could forget the password to their wallet. Effectively loosing those bitcoins forever (there are no provisions for the traditional “forgot password” reset).

b76167d939ee50ec61a4659c64057cbc


Ever try sending money to someone out of country? How long did it take, and how much fees did you pay? Probably a few business days, and about 10% after exchange rates and transfer fees. With Bitcoin, that changes to seconds, and around 2% after exchange rates.

How about being at a restaurant and noticing that their “machine” is down. And then noticing that the ATM is corner is conveniently online and ready to help. After a $5.50 service fee, you have your cash. But oh no, your bill is $32.65. You either leave $40 and deal with tip remorse for the rest of the day, or ask for change and have to deal with a bunch of metal for the rest of your life when it drops into your car seat on the way home. With Bitcoin, not an issue, as there is no machine. All that you and the merchant need is an internet connection. Transfer any amount, in seconds, for free. You save the ATM fee, and the merchant saves the 2% Visa would have charged him if the machine were online.

One really interesting thing about Bitcoin is that you do not need to be human to own it. Think about that. First, lets take a step back. To open a bank account you have to first be human. You have to have an ID. You have to basically prove to the bank that you’re bank material. Surprisingly, this is not as trivial as it sounds. Something like 7% of Americans (21 million people) are considered un-banked. Meaning they don’t have a bank account.

Capture


Live in a first world country, and the requirements are easier to meet. Harder elsewhere. About 2B people in the world are un-banked. A Bitcoin account is nothing more than an app on your phone. Anyone can download a Bitcoin wallet and immediately gain access to the currency. A person can get paid from an employer, right to their Bitcoin wallet, turn around and pay out to service providers. Bitcoin can be (in some countries, right now, actually is) a solution for those people.

Take Latin America for example. The whole region is dealing with arguably its worst economic crisis ever. Thanks to low oil prices, and the Chinese stock market crash, these countries are printing money to deal with deficits. Bitcoin holders in 2015 saw their coins perform more than 400% better than the Venezuelan Bolivar. Further, Bitcoin preformed 92% better than the Brazilian Real, more than 65% better than the Mexican Peso, and more than 41% better than the Argentine Peso. This is a threat not only for locals in these countries, but for foreign nationals working abroad, sending money home (remittance), and even for tourists.

The remittance industry is an interesting one. The stat is something like 10B US equivalent dollars is spent on fees alone every year. That money could have serious impact if it made it back home. A Bitcoin transfer from someone in Canada, back home, to the Venezuela, takes seconds and is virtually free. In these countries, an industry is popping up around currency conversion. Say the person in the Venezuela received a Bitcoin transfer and now needs to spend it on bread. They could ether find a merchant would accepted Bitcoin (Latin American merchant transactions finished 2015 having grown by 1,747% year-over-year), or, thanks to this new industry, have someone come to them to exchange their Bitcoin for Bolivar’s. Exchange rates for these services are about 1%.


Any way, huge tangent, I know.

Back to the being human part. You do not need to be human to own Bitcoin. Software can own Bitcoin. Imagine this. An electric autonomous car, who works as a taxi. Get’s paid in Bitcoin from it patrons. Drives itself to the (also autonomous) recharge station to fill its batteries, pays in Bitcoin. Drives itself through the automatic car-wash, pays in Bitcoin…etc. Imagine a robot filing taxes, just like you. Neat stuff!

Ok, ok. I’m sold. How do I get Bitcoin? This is the part, when I unfortunately have to mention Bitcoin’s infancy. Its been said, Bitcoin is now where e-mail was 20 years ago. 20 years ago, to send an email, you needed to be intimate with computers, programming, and TCP/IP. Today, you need an iPad and WiFi. Bitcoin today does not have an iPad or WiFi. Although it is getting better all the time. Probably the easiest way to actually acquire Bitcoin is, I’m ashamed to say, from an ATM machine. Yes, you’ll pay the same $5.50 service fee. But right now, it’s the easiest way to acquire Bitcoin.

Bitcoin_ATM_in_Vienna


Bitcoin’s WiFi is the online currency exchange. This is currently one of Bitcoin’s biggest growth areas. In theory, you link your bank account to the exchange, and then simply transfer money from your savings account into your Bitcoin wallet. The exchange acts like a middle-man. He accepts dollars, Pesos, whatever, holds back a transaction fee, and then issues bitcoin. Some of the better exchanges have built up the infrastructure to do this. However, their service is clunky and limited. Lots of room to improve. Another way to get Bitcoin, is simply to ask someone who has it. An employer, a friend, a person buying your used TV. Same way you’d acquire traditional money.

Ok, ok. I’m sold. Now that I have Bitcoin, where do I keep it?

Bitcoin’s iPad is the Bitcoin Wallet. This is probably the easier of the two technologies to accomplish, and thus wallet technology is further along in its development path. Keeping it simple, a wallet is just an app on your phone/tablet/computer. It has a unique address, which anyone can use to send you Bitcoin, and allows you to send Bitcoin out by typing in the address of someone else’s wallet. While you were reading this, I just sent Bitcoin to my friend in Nepal. And he’s texted me back saying that he’s having a great time at the bar, buying beers with the Bitcoin I sent. Not sure I would even know how to do that without Bitcoin.


In summary, Bitcoin is an alternative to traditional FIAT currencies. It allows anyone in the world to participate. And if anything, it introduces serious competition into the global finical system.

Quoting Andreas Antonopoulos, a Bitcoin evangelist:

“Bitcoin, and the concept of the internet of money that it creates, are this new model for a payment network that spans the globe, that has no borders, very much like the internet, that allows you to run financial applications that are controlled by software and, rather than political rules, are controlled by mathematical rules. The fact that the network can process payments as small as hundredths of a penny or as large as billions of dollars will enable all kinds of applications that are impossible with the traditional financial system.”


Check out Part-2 of this article for a deeper look into the underlying technology.

Battlefield 4 – Phantom Assignment – Because I find it interesting

In this article I’d like to talk about the Phantom Assignment in Battlefield 4.

I’ll also mention this here so the article makes more sense. How this game’s development path has worked is as follows:

November 2013 – Game published with 4 maps to play on.

December 2013 – Map expansion #1 with 4 new maps themed “China Rising”.

February 2014 – Map expansion #2 with 4 new maps themed “Second Assault”.

March 2014 – Map expansion #3 with 4 new maps themed “Navel Strike”.

July 2015 – Map expansion #4 with 4 new maps themed “Dragons Teeth”.

November 2014 – Map expansion #5 with 4 new maps themed “Final Stand”.

Ok then, lets take a step back to November 2013 when the game was first published. To accompany the game, the developers have created a companion web page that allows you to communicate with friends and view various statistics about your play. Nothing out of the ordinary here. This is more or less something the previous Battlefield games have had too. Fast forward a couple weeks, into December now when the China Rising expansion is released. While browsing the companion web page someone in the community discovers that strange looking skull has been added to the bottom of the companion webpage. It’s very faint and somewhat out of the way at the bottom of the page. That’s weird. Never seen that before.

phantomleaderboards

Said person notices that the skull is actually linked to something, so he clicks it. What opens appears to be a terminal entry window into some kind of secret ops portal. Here’s a screenshot of the terminal after the password has been entered. Password? What password?

bumpinthenight

Upon first seeing the terminal window, it would have stopped at the “ENTER PASSCODE” line. It turns out “bumpinthenight” was the correct password, and it looks like after entering the correct password the terminal displayed a few more lines.

Let’s take a step back and take in what’s happened. Day 1, someone notices this weird skull on the companion web page and finds that it’s linked to a terminal window. The terminal says “INITIALIZING PHANTOM PROGRAM”. Day 2, this person promptly reports to the community of his findings. Day 3, a modern day witch hunt begins to figure out what exactly is happening, what’s a Phantom Program, and what the password could be. It would later turn out that this was only one assignment of many assignments inside the Phantom Program. This particular assignment was called the Phantom Prospect.

Recall the 5 expansions that have occurred since the original game was published. In addition to the Phantom Prospect, new clues were discovered after each new expansion pack. In total 4 of the expansions have come with a  new phase to the Phantom Program. They are as follows:

Phantom Prospect – China Rising (expansion 1)

Phantom Trainee – Naval Strike (expansion 3)

Phantom Initiate – Dragons Teeth (expansion 4)

Phantom Operative – Final Stand (expansion 5)

—–

[Back to the Phantom Prospect]

So, where were we. Ah yes, trying to figure out the password. Remember we’re working with a terminal window, and nothing else. No clues to immediately work with.

The first clue appears when someone in the community discovers a random Genghis khan statue in one of the new maps. Remember these 4 new maps are themed China Rising. And after close inspection the statue appears to contain a braille marking.

statue


barille2

It will later be discovered that across the 4 new maps, there are 14 statues, each with a different braille marking. Here’s a list of the statues and their braille number:

Guilin Peaks: 20, 21, 16

Dragon Pass: 14, 14, 9, 8

Altai Range: 20, 13, 7

Silk Road: 2, 8, 9, 9

Noticing that each number is less than 26. Someone in the community theorizes that each number could correspond to a letter. A =1, B = 2, …etc

After conversion: t u p n n i h t m g b h i i

After I’m sure countless attempts to scramble the letters, it’s found that they should be arranged to spell: bumpinthenight.

Going back to that terminal and entering the password proved successful.

The Phantom Prospect has been cracked. Great, now what?

Well, as a reward for entering the correct password, you’re greeted with a prize. In this case it’s a unique dog tag for your character to wear. Note that anyone can log into the terminal and enter the password to claim the reward, not just the first person to do so.

—–

[Fast forward to March for the Naval Strike expansion – Phantom Trainee]

This one is kind of weird, but bear with me.

So, it’s March and we have 4 new maps themed Navel Strike. The terminal window has also updated, and is now asking for a new password. So we know a new phase of the Phantom Program is upon us. Let the hunt begin!

One day while searching for clues, on one of the new maps, someone discovers door with “Kevin Simpson1942” on the name plate.

kevinsimpson

You need to be a fan of the Battlefield series to get this one, but in the game called “Battlefield 1942”, Kevin Simpson was a character. So, as any rational person would do, www.kevinsimpson1492.com was entered into the browser and sure enough it was a real web page! Among other things, the web page linked to this image:

ks1942

And again like any rational person would do, they started looking for clues in the image. I’ve circled the clues in the image, note how there are 5 clues. In the end, the clues work out to spell “DREAM”.

How? This does not make any sense.

Lets start with the coke bottle on the floor. Notice how it has the number 500 on it? Turns out, the Roman numeral translation to english of 500 is the letter D.

dates roman english

Next look at the back wall, there’s a Morse Code character on the frame the looks like a dot with line and another dot. Converted to English letters this is the letter R.

morse

Next look at the yellow sticky note on the roof. It just so happens that this character belongs to the Windings character set, and once converted to English represents the letter E.

wingdings

Next notice how the ladder leaning against the wall kind of looks like the letter A. Well it does.

Now for our last letter, notice the symbol engraved into the ladder. This, it turns out, is the Viking symbol for the letter M.

runes

So, we now the have spelled DREAM. Great, someone try this in the terminal. Hold on, the terminal isn’t accepting this as the correct password? It would just so happen that the password is not yet complete.

I’d like to mention that to find the word DREAM took the effort of the entire community and with the help some of the developers. This was truly a team effort.

For the next part of the password, it was noticed that the kevinsimpson1942 web page had some background music playing. The web page also let you download the audio file. So, as any ration person would do, the file was downloaded and inspected. Viewing the audio track as a spectrograph showed something very interesting. The word EPIC.

epic

All right, we’ve got it, back to the terminal. EPIC DREAM. Didn’t work… Dreams were crushed.

But alas, the developers kept urging the community to keep digging as they were getting close.

It was then discovered that kevinsimpson1942 had a profile on the companion web page. And this his emblem was changing daily. Notice how above the character’s shoulder there appears to be a grouping of planets. Well, someone behind the scenes was changing the amount of planets on this profile page daily. Someone in the community recognized this and eventually came to the conclusion that this must represent the word WORLDS.

ksbl

Back the terminal we go, sure enough the community now had it!

EPIC DREAM WORLDS.

Wow, that was exhausting. But also really fun.

Entering the correct password rewarded the user with a unique camouflage for their weapon.

—–

[Into July now for the Dragons Teeth expansion – Phantom Initiate]

This one is even more obscure than the previous. But fun. Lets get started!

Jumping straight into the clue hunting, 8 Pictograms are discovered in various places around the 4 new maps. Just little marking on sides of walls in really out of the way places.

pictogram1

All 8 of them lined up are as follows:

pictogramAs it turns out, these Pictograms are of the Bauga character set. From Wikipedia: The bagua (Chinese: 八卦; literally: “eight symbols”) are eight trigrams used in Taoist cosmology to represent the fundamental principles of reality, seen as a range of eight interrelated concepts. Each consists of three lines, each line either “broken” or “unbroken,” representing yin or yang, respectively. Due to their tripartite structure, they are often referred to as “trigrams” in English.

To convert into trigrams we’ll need this table:

trigrams

From this we can take the pictogram, that has two pictures (one over the other), and end up with two trigrams stacked on top of each other. Using the lookup table below to convert our now stacked trigrams into numbers.

pictogram4

Wikipedia again comes to the rescue with this table.

After conversion, our original pictograms give us the following numbers. Note that the numbers can be arranged into an order representing the Fibonacci sequence. This turned out to be a decoy.

1 1 2 3 5 8 13 21

One clever chap decided to convert the numbers into their decimal equivalent. Using the lookup table above, Wikipedia shows us the various conversions. Here’s the conversion for the number 1:

hex1

After conversion, our new number set ends up being:

19904 19904 19905 19906 19908 19911 19916 19924

Keeping it rolling, remember that terminal window? Well there are now some clues in there that we need to take a look at. This is actually a screen shot from a community member’s terminal:

terminal3

Three clues we need to make note of. The first in the function DIG 11 (max, floor). Form this we use the first variable “max” to rearrange our number sequence in order of largest to smallest:

19924 19916 19911 19908 19906 19905 19904 19904

We’ll come back to the floor part in a minute.

The second clue is the number he has highlighted. This as it turns out is an ISBN of a text book on polynomials.

So using our string of numbers in a polynomial sequence gives us:

19924*X^0 + 19916*X^1 + 19911*X^2 + 19908*X^3 + 19906*X^4 + 19905*X^5 + 19904*X^6 + 19904*X^7

The third clue we take from the terminal window is CHI: 7.2515… And after a clue from a developer, CHI if you recall is Greek for X. And we can now use this value to plug into the equation above.

After doing the math, our polynomial sequence equals: 24344241893.000178…

Here’s where the floor part of the function comes into play. We simply truncate the number and are left with simply: 24344241893

This as it turns out is the correct password.

Again, this was truly a community effort. The internet was literally on fire as the community was collaborating trying to make sense of the clues.

The reward for this assignment was a unique camouflage for your character’s uniform.

—–

[It’s December, to the Final Stand expansion we go – Phantom Operative]

This is a bit more straight forward than the last two, but still somewhat tricky.

When the Final Stand expansion was released many people noticed the terminal window updated to show the following message (notice the text “physical access required”):

phantom-operative

This was the first clue that seemed to indicate you needed to be somewhere physical to unlock this one. It wasn’t just a password in the terminal like the previous three assignments. Where was this magical place? One theory was an elevator hidden away in the back of one of the new maps. The power to the elevator seemed to be turned off, and there were no buttons to press. Dark scary elevators are often places of interest right?

In the following few days one of the community members was digging through the code for the game and noticed a few audio files in Russian (the Final Stand map pack was based in Russia) that seemed to indicate the elevator was in fact the correct place to be.

The audio he found said things like “Elevator access granted”, “Welcome operatives”, “Access denied”. All in Russian of course. But, this seemed to confirm the elevator.

A keen ear also pulled out that the word “operatives” was plural, indicating that more than one person needed to be in the elevator to activate it.

A few days passes and suddenly people started finding dog tags scattered around the 4 new maps. The dog tags actually weren’t scattered, they seemed to randomly appear in different places at random times throughout the game. The tags were hard to find as they appeared in a tiny boxes in the same color as their surroundings. Here are a couple examples:

dogtag dogtag1

It had been theorized that a new dog tag would appear every 10 minutes throughout a game, and in different places. Community members started noting where the tags appeared and built up a maps available for all community members to use in their hunt for a tag. People were literally spending hundreds of hours walking around the 4 new maps looking for these elusive dog tags. Here’s an example of one of the maps created:

hammerheaddogtags

As dog tags were found it was theorized that they might unlock this magical elevator. Didn’t work. People were equipping their characters with the dog tags trying to gain access to no prevail.

Remembering that keyword “Operatives”, it was then theorized that in order to gain access to the elevator maybe 4 people needed to be in the elevator, each wearing a different dog tag (one from each map). This didn’t seem to work either.

Maybe in addition to the 4 unique dog tags, characters also needed to be wearing the unique dog tags from the Phantom Prospect assignment, the weapon camo from the Trainee assignment, and the uniform camo from the Initiate assignment?

YES! This worked. The solution was to have 4 people in the elevator, each with a different dog tag, and each wearing the rewards from the previous assignments. Once inside the elevator the button (that was previously dark) lit up enabling the players to ride. And while ridding those same audio files found earlier began to play. Neat!

After the ride down the elevator, the 4 players were no left standing in front of what appeared to be a force field with key pad.

phantombow

It wasn’t enough to get down the elevator, we also needed a pass code? Come on developers!

Back on the hunt, it was discovered a unique place existed in each of the 4 new maps that either spoke Morse code or flashed a light in Morse code. Again, these are really obscure, out of the way places not usually traveled to in a game. The clever community members really had to search hard for these spots.

For future reference, the 4 places are as follows:

morse3 morse4 morse1 morse2

Once translated, the Morse codes each gave a unique number. It turned out once assembled in the correct order, this was the password to the keypad.

1290-429-397648-970

Now we could get inside the force field and take a look at the shiny new cross bow. Picking up the cross bow seemed to be the point of getting into this room. Players were now free use the cross bow in future games.

phantombow1


—–

So there you have it.

This has been the extent of the Phantom Program thus far.

Pretty neat hey?


G-SYNC Review – And my experience with the two hottest monitors anyone had ever hoped to get their hands on this year: Acer XB280HK & Asus PG278Q

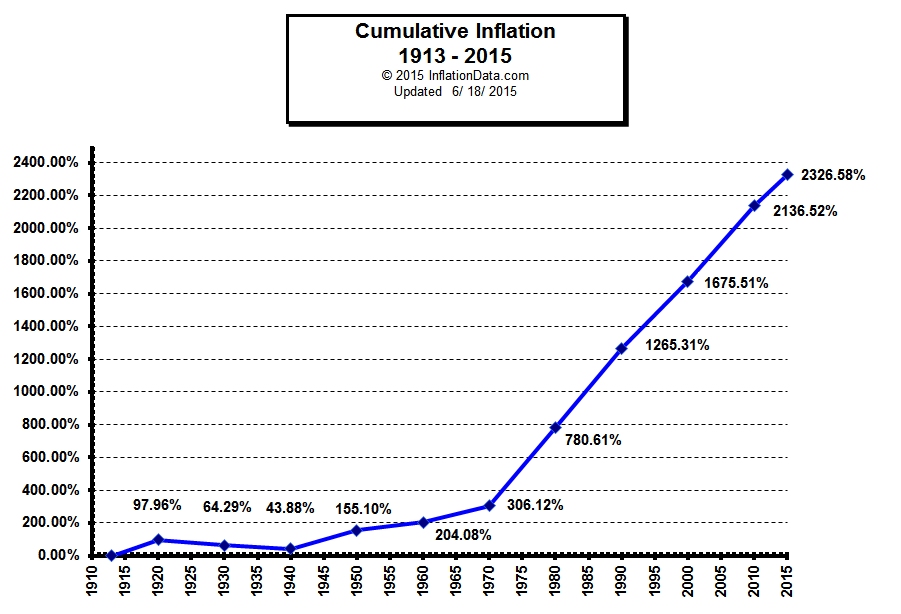
Before we start here are some quick facts on the three monitors referenced in the article.

Acer XB280HK – 28″, 4K resolution, 60Hz refresh, TN display technology, G-SYNC technology

Asus PG278Q – 27″, 2.5K resolution, 144Hz refresh, TN display technology, G-SYNC technology

Asus PB278Q – 27″, 2.5K resolution, 60Hz refresh, IPS display technology

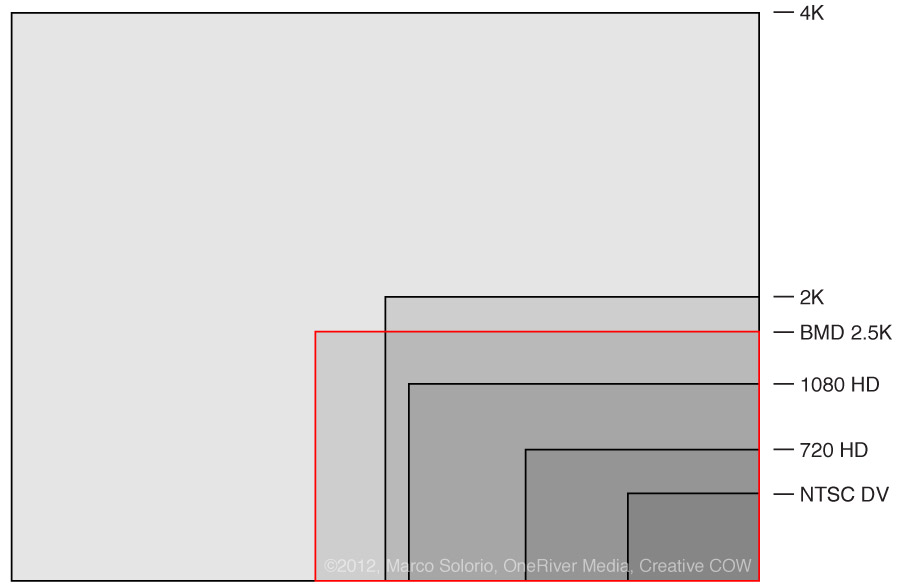
4K resolution – the monitor is able to display 3840 pixels in the horizontal axis and 2160 pixels in the vertical axis (3840×2160 or 2160P).

2.5K resolution – the monitor is able to display 2560 pixels in the horizontal axis and 1440 pixels in the vertical axis (2560×1440 or 1440P).

Most TV’s today come in a 2K resolution (1920×1080 or 1080P). 2.5K was kind of the next step up in resolution to satisfy the never satisfied PC gamer / productivity worker but never made the jump into the consumer TV space. 4K is next step sweeping through display technology and is coming to both the consumer TV and PC spaces. 4K, 2.5K, 2K, 2160P, 1440P, 1080P, … are all marketing terms used. Use whatever makes the most sense to you.

Basically you can use the additional resolution to make the physical screen bigger without loosing quality, or to cram more detail into the same sized display. TV’s will benefit from high quality larger display sizes, while the PC crowd will benefit from the increased detail in the same sized screen.

Here’s a good graphic I found online illustrating the differences in resolutions between the three:

formats

Talking about the differences in LCD display technology could probably fill another article, the quick and dirty is as follows:

TN (twisted nematic) display technology – Older display technology (originally developed in the 1980’s), cheaper, worse image quality, shorter response time. Known for poor viewing angles.

IPS (In-Plane Switching) display technology – Developed to fixed shortcomings in TN technology, Newer display technology (originally developed in the 1990’s), more expensive, better image quality, longer response time. Known for great viewing angles.

G-SYNC – a technology allowing the graphics processor to dictate the refresh rate of the monitor. G-SYNC requires a physical piece of hardware in the monitor to handle this variable refresh rate. Hence you need to buy a new monitor with a pre-installed G-SYNC module. A brand new technology that aims to solve the limitations with V-SYNC.

V-SYNC – a technology allowing the monitor to dictate the refresh rate of the graphics processor. This is purely a software solution and is usually available as a setting the user can manually flip on or off. An older technology intended to synchronize the monitors locked fresh rate with the variable refresh rate of a graphics processor.

The theory with G-SYNC is that graphics processors never generate a consistent frame rate. Depending on the detail in the scene being generated the processor might take longer or shorter to generate that frame. If the monitor were able to refresh at the same rate as the graphics processor, the resulting video image might look smoother. I’ll get into why later on.

—–

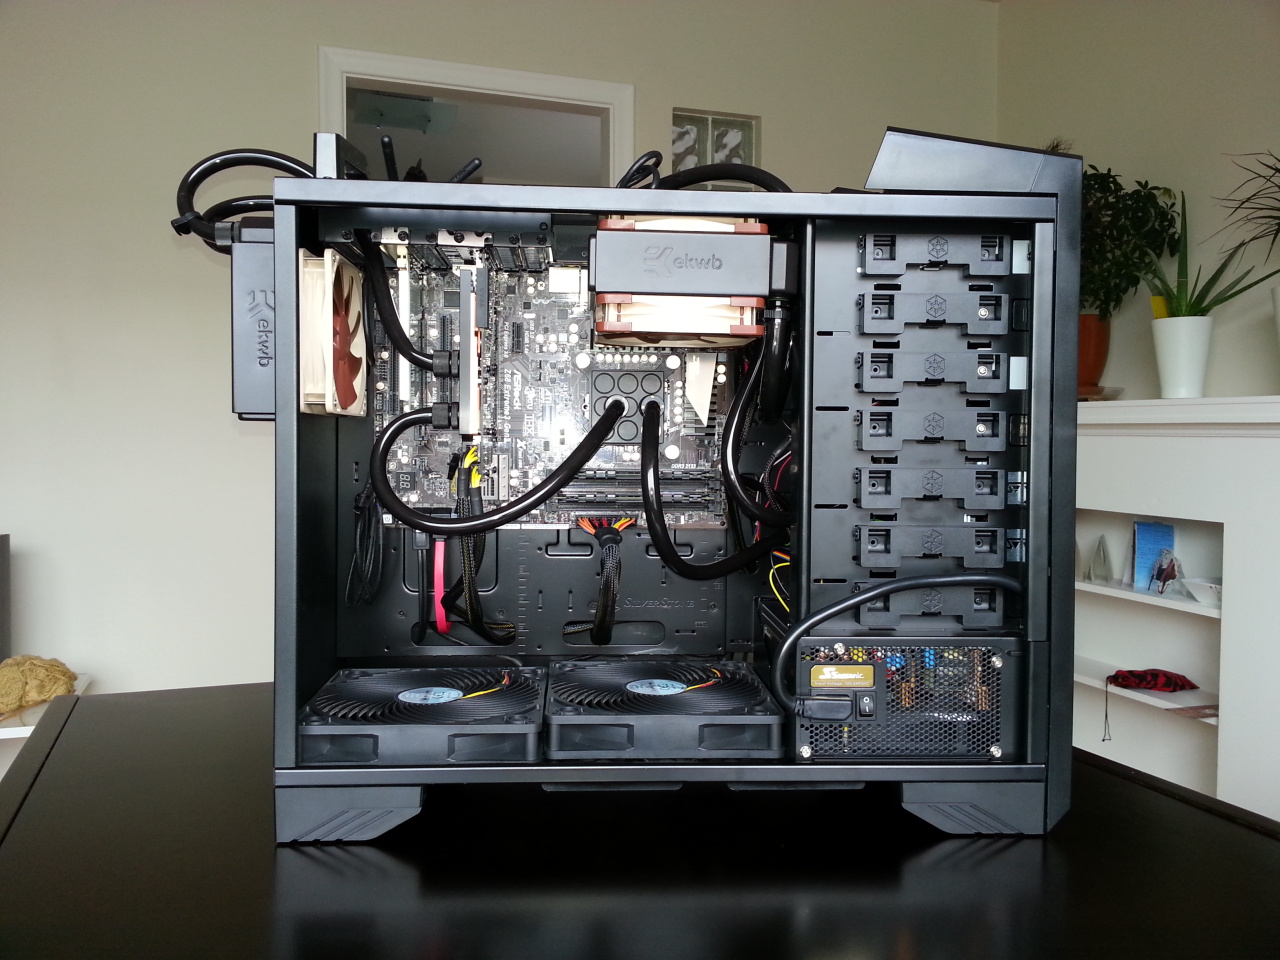
I’ll preface this mini review by mentioning that I’v been using an Asus PB278Q IPS 2560×1440 monitor for the past 2 years or so. Opinions on the others are relative to the Asus.

—–

[November 29, 2014 – Acer XB280HK – Part 1]

I’ve had the XB280HK monitor for two days now and have logged maybe 5 or 6 hours thus far.

The first night I spent about 2 hours playing around with the settings and poking around online looking for settings to try. I found some forum posts and even one reviewer had posted his windows calibration file. The result was not impressive to say the least. Out of the box, the picture looked too white, bright, lacking contrast,… and I couldn’t fix it by manually adjusting settings in the OSD. This could very well be down to my skills with the OSD though.

The second night I fired up my hardware calibrator (Spyder4Pro) and got the monitor dialed in. I wouldn’t say the calibration was a night and day difference, but it did help a lot. Colors looked more realistic, and the contrast came back.

However, no amount of calibration can get rid of the TN’ness of the monitor. I’m bobbing my head up and down (about 6 inches) as type this and notice that the monitor is changing from a cool blue tint to a warm red tint depending on the elevation of my head. During normal use I constantly find myself changing the angle of the screen or slouching in my chair trying to determine if i’m looking at the screen at the correct orientation. This isn’t too noticeable while gaming mind you. While gaming, I just sit back and stare at the center of the screen. The monitor looks fine in that situation.

The jump from 1440P to 4K wasn’t as mind blowing as I’d chalked it up to be. I can for sure tell there are more pixels on this screen, but I wouldn’t say it’s like getting sight back after being blind. Just for fun I stretched a 1080P image to fill the monitor, then flipped to a native 4K image (4k is exacly 4x the resolution as 1080P, so there should be no weird stretching going on in this experiment). This was in fact the mind blowing jump people must be talking about. However, I’d say for a monitor of this size, 1440P is good enough. 4K is just a nice to have.

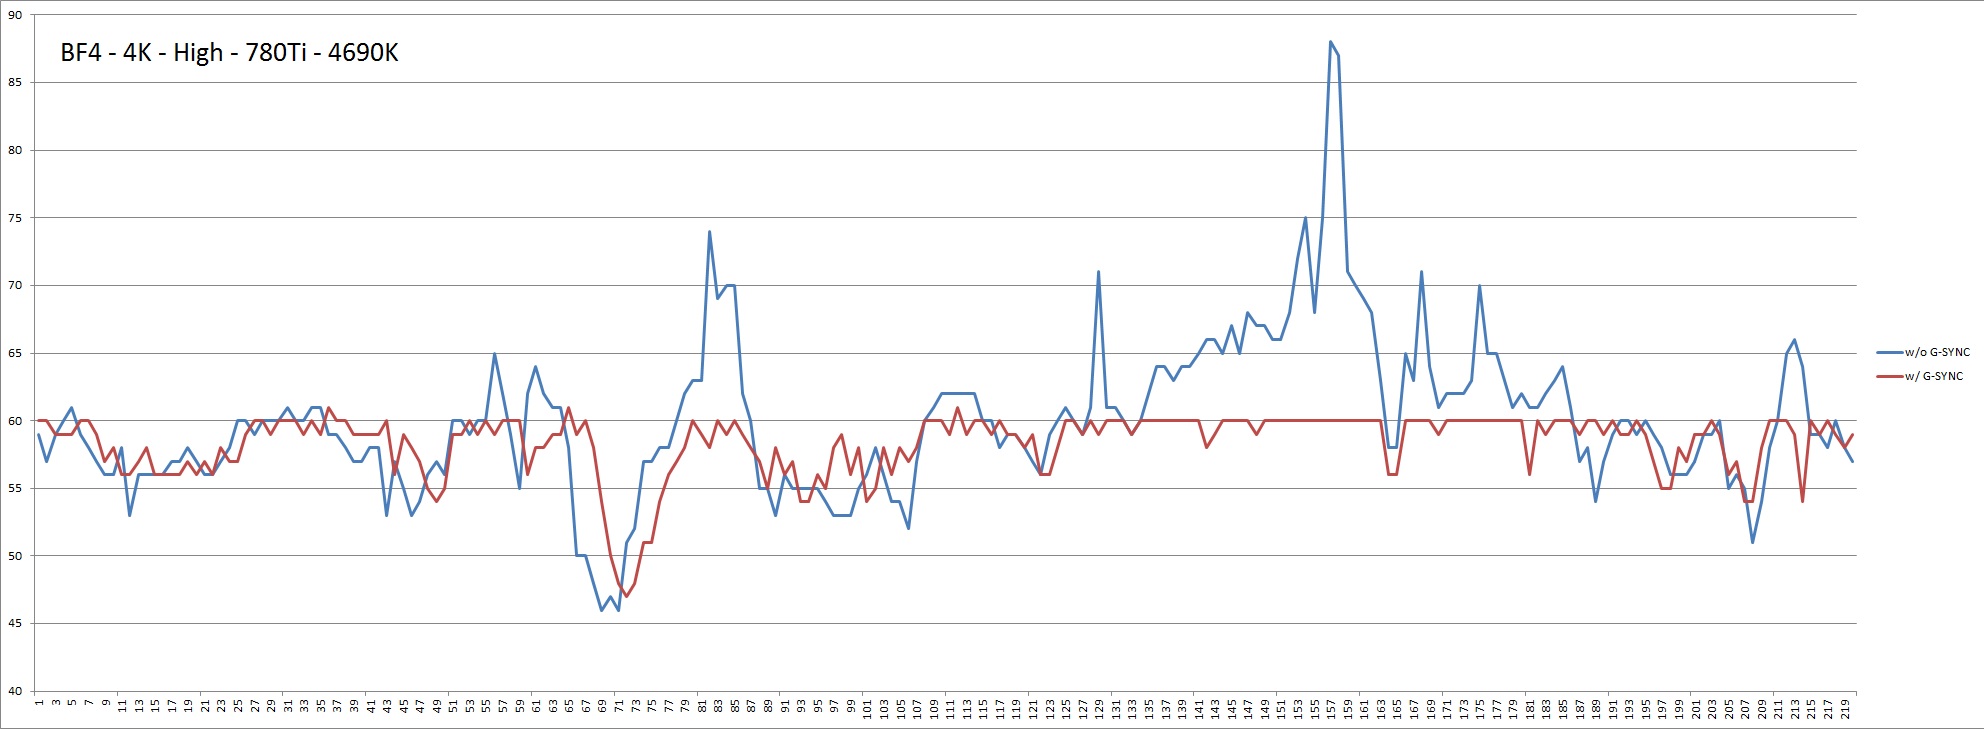
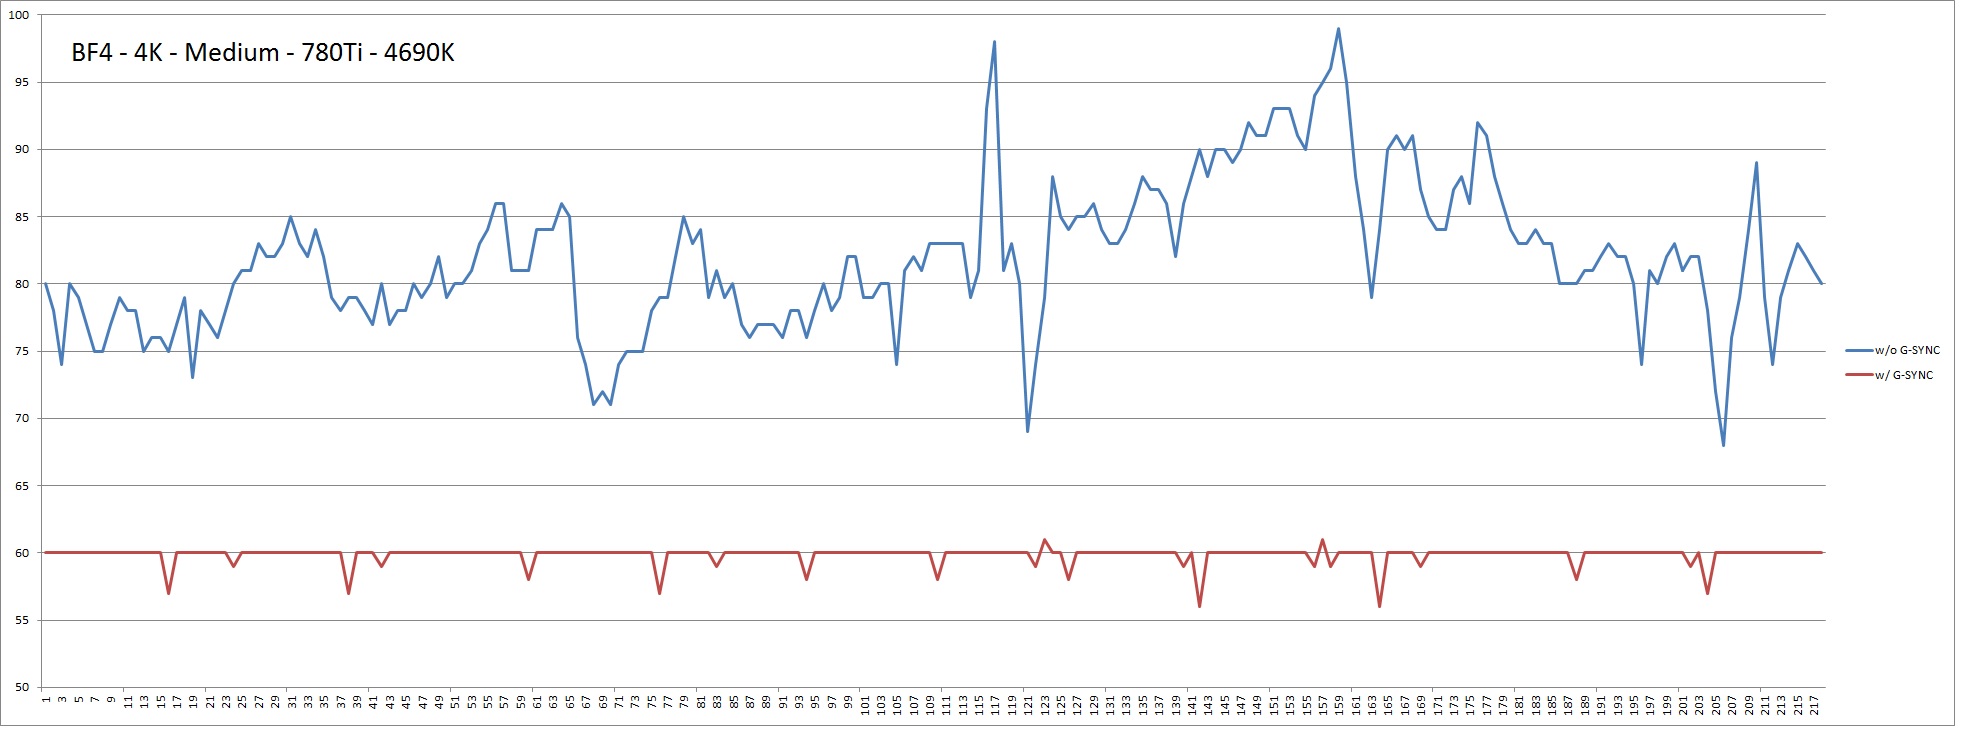
I’ve mostly played Battlefield 4 with the monitor. Both with and without G-SYNC. I’m not sure if I can see a difference to be honest.

With it enabled the game might be smoother, but I can’t be 100% certain. To be sure it was even working I took some FPS logs. And sure enough, it appears to be doing it’s job. I would have liked a red LED or something to indicate G-SYNC was active. The PG278Q does something like this, and I think it’s a feature the XB280HK needs to have.

Below is the FPS log w/ and w/o G-Sync.
I suppose G-SYNC is working as it appears to be limiting the frames to 60Hz.
To disable G-SYNC I went into the NV control panel and unchecked the box / set vertical sync to OFF.

Note that G-SYNC works exactly the same as V-SYNC when the graphics processor is generating frames faster than the refresh rate of the monitor. This is why the medium setting seems to lock the frame rate to 60Hz, which, is no coincidence, the maximum refresh rate of the monitor.

Graphics Settings on High:

high1

Graphics Settings on Medium:

medium1

I think the high setting is where this particular game should be played with G-SYNC. This lets the game target 60FPS on the high end, and any small dips below should be taken care of by G-SYNC. i.e. the monitor will be changing its refresh rate based on what the graphics processor is doing. This is the thing though, the game still felt a bit choppy during those few dips. I really don’t know what to think at this point.

I came into this G-SYNC thing thinking it was going to be mind blowing. Like all the reviewers said, and like the NV demo video showed (the one with the clocking ticking back and fourth). But, I’m just not seeing it. I’m sure it has something to do with the fact that early G-SYNC adopters happen to be using the PG278Q, a 144Hz panel. The smoothness they talk about is IMO more related to the high refresh rate than G-SYNC.

I’l continue testing over the weekend, but as it sits now: is this thing with $800? – Probably not.

—–

[December 1, 2014 – Acer XB280HK – Part 2]

Tonight I did a little more testing.
I set up a second computer directly next to mine with the old PB278Q and a GTX 970.

The PB278Q and XB280HK are both 60Hz panels, the differences being the PB278Q is IPS and doesn’t have G-SYNC, while the XB280HK is a TN panel and has G-SYNC. So we’ll be comparing TN vs. IPS, and G-SYNC vs. no-G-SYNC.

With the two monitors now side-by-side (PB278Q on the left, Acer XB280HK on the right), I fired up Battlefield 4 on both, joined an empty server, and jumped back and fourth between machines trying to determine if there was any difference. I’ll note that based on some benchmarks my GTX-970 and GTX-780Ti are pretty close in terms of performance. The 970 is a little bit slower but not much. So for this article I’ve more or less assumed they are equal in terms or performance. This lets us focus on the monitors.

Notice right away the XB280HK on the left is noticeably brighter and washed out relative to the PB278Q on the right. This is one negative characteristic of TN panels – their viewings angles. you need to be sitting directly in front on the screen for it to look good. The IPS, on the other hand, gives much better viewing angles.

IMG_20141129_155818

Cliff notes – I’m now sold on G-SYNC, but hate TN display technology more than ever.

With the two monitors side-by-side I can now tell G-SYNC is working it’s magic. With the non-G-SYNC monitor (call this the 970 machine) I have to play at much higher frame rates to get a smooth experience. i.e. with the 970 machine I need to play at medium settings (which averaged at about 125FPS) to get the same smoothness that my G-SYNC monitor (the 780Ti machine) was getting at 60 FPS. I attribute this directly to G-SYNC.

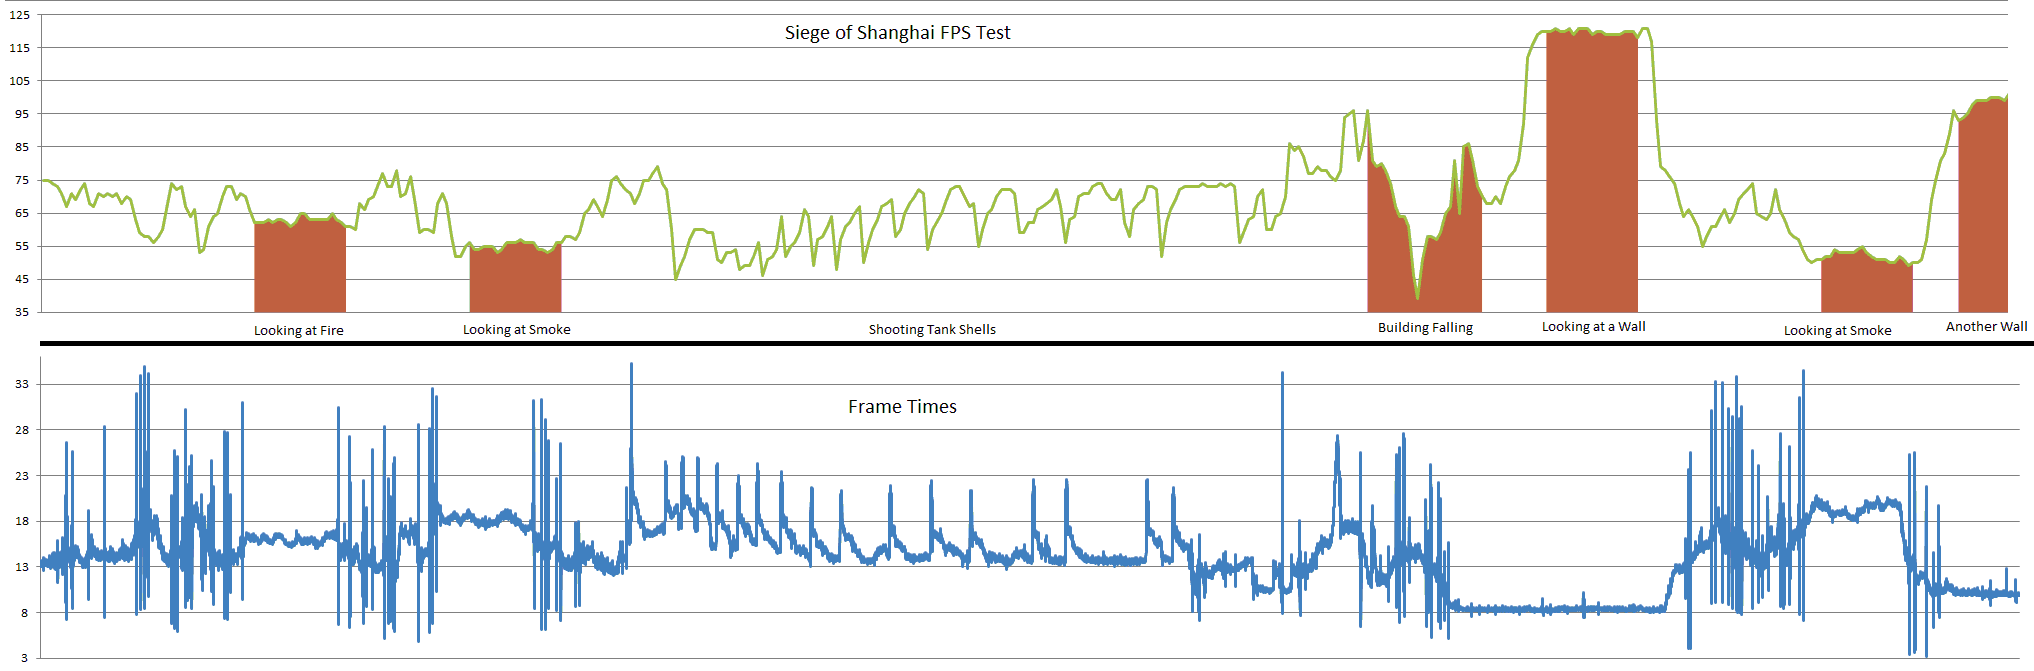
I used the FRAPS tool to capture the FPS in game at Medium, High, and Ultra settings. With the 970 machine I noticed that the Ultra setting (averaged 65 FPS) was fairly choppy. Dropping it down to High (averaged 95 FPS) made the game play a bit smoother, and finally dropping it down further to Medium (averaged 125 FPS) resulted in a fairly smooth game play. Here’s the comparison between the three:

FPS

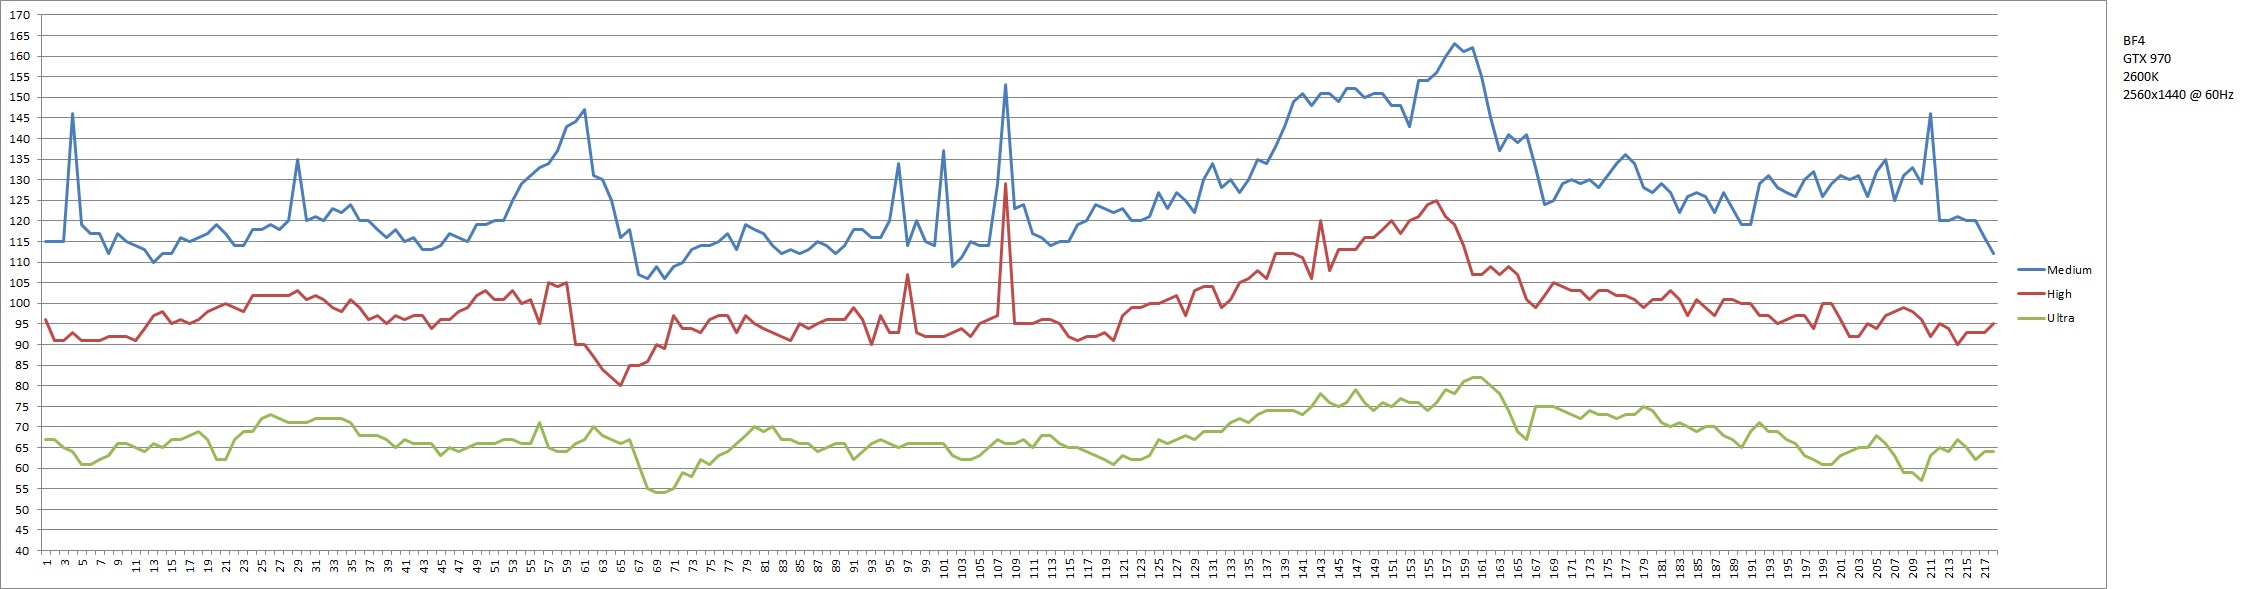
So ya, Medium settings with the 970 machine, which was required to average 125 FPS, produce a similar experience to High settings with the 780Ti machine, which was required to average 60 FPS.

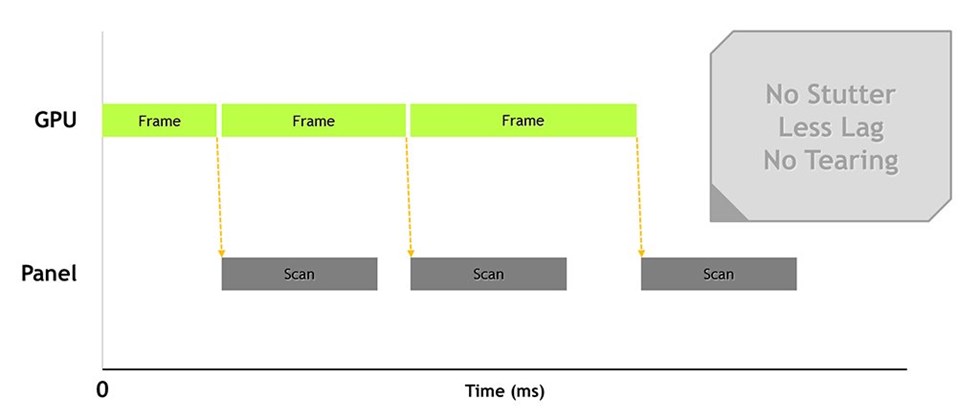
After a couple hours messing around in excel, I think I can graphically explain what was happening.

Here’s the Frame Time analysis on the Ultra setting with thr 970 machine.
The top bar is the refresh rate of the monitor, 60Hz, so once every 16.74 ms.
The bottom bar is what the GPU was delivering.

Try to line up the vertical tick marks with the bottom bar and notice that often two frames are shown during a monitor scan, or the frame is dropped completely.

Ultra

Here’s the Frame Time analysis on the Medium setting with the 970 machine:

Medium

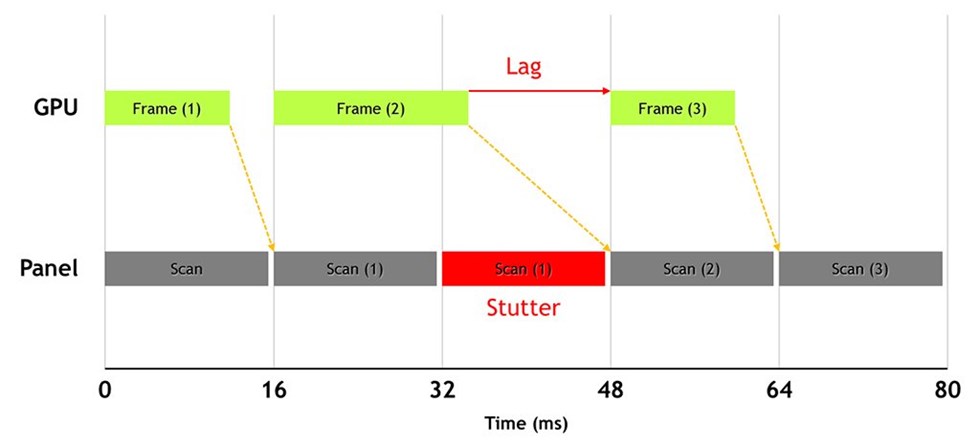
I was trying to understand what was causing the Ultra setting to be so choppy even though it was averaging 65 FPS (higher than the refresh rate of the monitor). As you can see from the above two graphs, both Ultra and Medium settings are not in sync with the monitor. In either case frames are dropped, and tearing occurs. Note – tearing occurs when two frames are displayed during one monitor scan. i.e. the monitor will begin showing one frame, meanwhile the graphics processor is chugging away in the background. If it happens to finish generating that frame before the monitor is done its refresh cycle, that image will be shown as well.

Here’s a case where the monitor shows two images during one of it’s refresh cycles. In this case the monitor would begin scanning a new image at time zero. It looks to be initially be displaying an image the graphics processor generated some time ago. About a quarter the way through displaying the image, the graphics processor would have just finished generating a new image, so the monitor shows that too. This is as out-of-sync as it gets.

Screen-tearing


On the Ultra setting because frames are generated at a slower rate (relative to the Medium setting) the tearing and dropped frames are much more apparent. i.e. the two frames have a big enough difference between them that a you can visually see the difference.

On the Medium setting because frames are generated faster, the two consecutive frames have a much smaller difference between them (relative to the Ultra setting). So even though the GPU and monitor are still out of sync, the tearing and dropped frames are not as visually apparent.

Obviously with G-SYNC this isn’t an issue as the monitor is synced with the GPU. In the above two graphs this would have the effect of moving the vertical tick marks to align with the bottom bar, not the top. Imagine how this would look. You now wouldn’t be dropping frames, or showing two frames during one monitor scan (tearing). Here’s a slide form the G-SYNC demo. In this slide the graphics processor looks to be generating frames at a slower rate than the monitor can refresh. But notice how the graphics processor is dictating when the monitor can refresh.

big_gsync

Now, on to the 4k part of the XB280HK.

I’m still having trouble seeing a “mind blowing” difference relative to the 1440P panel. Sure it’s a bit sharper, but nothing to spend a premium for. I’ll note that I wasn’t using any AA with either panel (1440P or 4K). Maybe with AA applied to both panels the difference will become more apparent? Who knows. I think this just confirms the fact that you really need a panel sized larger than 27″ to take advantage of the extra resolution.

Finally, I still hate TN panels. With the two panels sitting side-by-side the image quality difference was really apparent. I could look at the TN from any angle and see a different color. And even when sitting in the sweet spot the colors are far weaker than the IPS. Gaming on this thing isn’t too bad, but when working on a word document, or typing in this reply window my eyes start to strain after a while. The whites are either blue or red depending on how you’re looking at it.

The IPS on the other hand didn’t hurt my eyes, had great viewing angles, and the colors were much better.

I think I’ll keep the Acer for a couple more days. Maybe I can get used to the colors…

—–

[December 3, 2014 – Acer XB280HK – Part 3]

Today the XB280HK went back to the store. I just couldn’t live with the poor viewing angles. That and I found a solution for my existing PB278Q that looked almost as good as the XB280HK while costing $800 less.

The whole point of G-SYNC is to allow your GPU to deliver frames rates at an inconstant rate and have the resulting image look acceptable. This was apparent in the above findings. I was able to play a game on a higher graphics setting with G-SYNC than I would have been to without it. i.e. I could play on ultra with G-SYNC, and medium without G-SYNC and get a similar experience in terms of smoothness. By smoothness I mean the resulting image looked more like a moving subject and not like a series of still images stitched together.

This is good. We all want to play games with more detail. This is what makes them feel so immersible and realistic. But I’ve returned the XB280HK, so the quest continues to try to make my existing PB278Q monitor look good.

My girlfriend loves the game Tomb Raider. This is another neat one I found showing what 13 years of development looks like (The year 2000 vs 2013). Changing graphics setting from low to Ultra wont look as bad as this, but you get the idea:

Tomb_Raider_Original_Graphics_Compared_To_Reboot


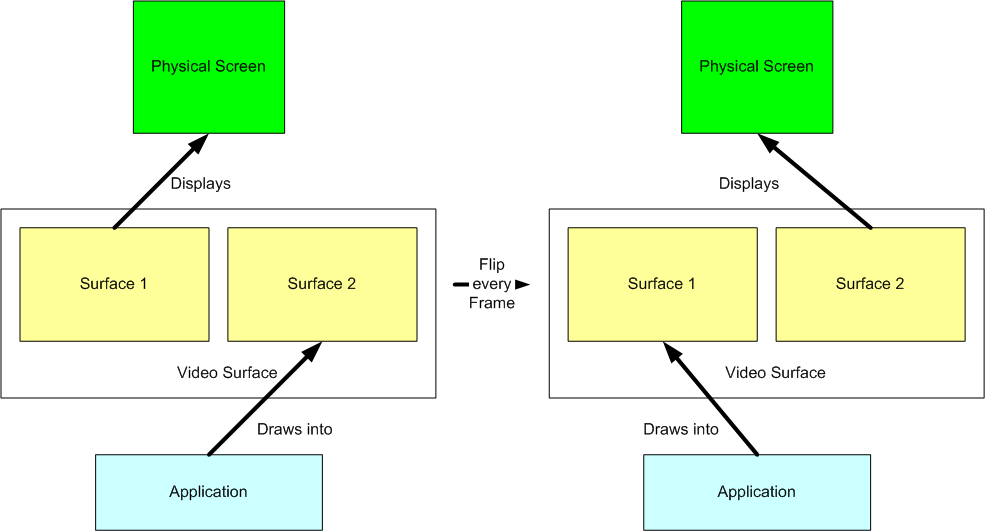
I’d now like to touch on the concept of buffering. When a graphics processor generates an image (remember, while generating 60 frames per second, the graphics processor must generate one frame every 16.74 msec) it places it in a piece of memory called a buffer. When the monitor goes to display that images it looks at that buffer and begins scanning out of it. And by scanning I mean the monitor is pulling the image out of the buffer from top to bottom and drawing on the screen top to bottom. Traditionally, the buffering process involves two buffers and is called double-buffering. While the monitor is scanning out of buffer A, the graphics processor is working on generating the next image and placing it into buffer B. When the monitor finishes scanning buffer A, it flips over to buffer B and begins scanning that. The graphics processor also flips buffers and begins working on placing the next image into buffer A.

Here’s a neat graphic I found online:

DoubleBuffering


Just keep this concept in mind for a sec.

Continuing on our quest to make the PB278Q look good, we can also enable V-SYNC. As it’s free (merely a software solution that can be enabled in games) solution, anyone can take advantage of it. The key here though, is for it to look good the graphics processor needs to be generating images faster than the refresh rate of the screen. Remember V-SYNC works by locking the refresh rate of the graphics processor to that of the monitor. So in my case, the monitor is a 60Hz panel, thus V-SYNC enables the monitor to tell the graphics processor to give it a new frame every 16.74msec.

In this example, the graphics processor might be taking longer than 16.74msec to generate a new frame in some cases and thus the same image can be shown twice. This is perceived by our brains as a lagging effect. Not natural motion. When V-SYNC is enabled, it’s important to make sure you’re graphics settings are adjusted as to give the monitor a new frame on time to avoid the lagging effect.

big_vsync

Great, we’re golden!

Nope. Hold on, one more point.

With V-SYNC enabled and graphics settings adjusted, there could still be an issue. If the graphics processor is generating new images too fast, it could be filling the buffers too fast. And because it’s now prohibited from filling a buffer until one is released from the monitor, we could run into some lag as the graphics processor has to introduce some artificial delays to match the refresh rate of the monitor.

To combat this we can introduce a third buffer into our buffering system. Call this triple-buffering. In this case the graphics processor always has a free buffer to begin writing into. When the monitor goes to refresh it takes the most recent image, producing a smooth image on the screen.

Luckily most graphics processors support triple-buffering, so we just need to enable it, in probably the same place that V-SYNC is enabled.

So, with these two (free) features now enabled, I was free to adjust the graphics settings of my games to get the best possible image. My end result was a mix between ultra, high, and medium actually. This got me an average of about 70FPS, with a minimum of about 62 FPS (higher than the refresh rate of the monitor).

So, although this is not the pure Ultra setting I was enjoying with the G-SYNC monitor, I’m pretty close. And the $800 was back in pocket. This is a compromise I’m willing to make, and I think you should too.

—–

[December 18, 2014 – Asus PG278Q – Part 4]

Part 4 of this review involves my most recent acquisition, the Asus PG278Q. Not to be confused with my existing Asus PB278Q.

Cliff notes – This thing is amazing!

The PG278Q comes with G-SYNC like the XB280HK before it, but also comes with a higher native refresh rate. 144Hz vs. 60Hz.

This is nothing new, there are other 144Hz monitors available, but what makes this one so special is that it does it while maintaining a 2.5K resolution and offering G-SYNC. This is currently the only monitor capable of 144Hz, 2.5K, and G-SYNC.

Basically, this monitor is capable of showing you more than twice the amount of information per second relative to other 2.5K resolution monitors. Your brain perceives this as a more fluent motion, and you’re better able to track fast moving objects. That’s it. After using 60Hz monitors for so long, I didn’t think I needed anything more. But as a blind man once said, I was once blind but now I can see.

144hz-vs-60z

Keep in mind that there is a difference between, “how fast does a monitor need to refresh for a human to perceive motion?”, and “how many frames per second can the human eye see?”.

You might have seen this quote pasted around the web: The USAF, in testing their pilots for visual response time, used a simple test to see if the pilots could distinguish small changes in light. In their experiment a picture of an aircraft was flashed on a screen in a dark room at 1/220th of a second. Pilots were consistently able to “see” the afterimage as well as identify the aircraft. This simple and specific situation not only proves the ability to percieve 1 image within 1/220 of a second, but the ability to interpret higher FPS.

What the very first movie producers discovered has stood true for more than 100 years. 24 frames per second is fast enough for a human to perceive motion. That is, the video camera captures a new image 24 times per second. Even today, modern movies are shot at 24FPS (they’re actually played back at 72FPS, but that’s another topic).

This is good and all, however, we’re not sitting back in a couch watching a movie, we want to play fast paced action games. In these cases it’s clearly beneficial to display action as fast as possible.

The only catch here is that in order to take advantage of the higher refresh rate, your graphics processor must be able to generate these additional images.

At 60Hz, a new image must be generated at least once every 16.74msec.

At 120Hz, a new image must be generated at least once every 8.33msec.

At 144Hz, a new image must be generated at least once every 6.94msec.

To combat this problem we have two solutions. We can either add a more powerful graphics processor, or reduce the graphics settings. At this time, because a more powerful graphics processor simply hasn’t been invented yet, we’re left with one option.

And I suppose this is a compromise. High fresh rates with a lower detail, or low refresh rates with a higher detail. This will depend on what game you’re playing, but in my case with fast paced action games we want the higher refresh rate.

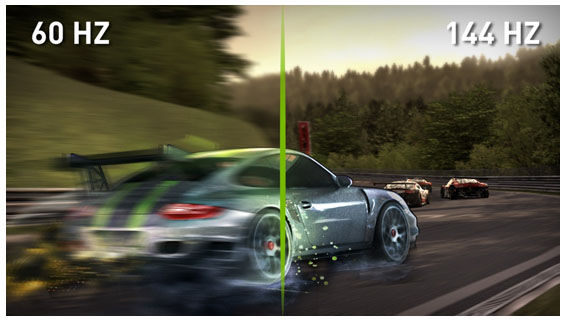
After using this monitor for a couple of days now, I can confirm that high fresh rates with a lower detail is the correct compromise. It’s pretty amazing, the difference between looking at action scenes at 60FPS vs. 144Hz.

There’s actually one last compromise that this monitor asks us to make. That is to again accept the TN’ness of the panel. Like the XB280HK, this one also has a TN based LCD display. I can confirm that the colors are not as accurate as the IPS PB278Q, but they’re miles better than the XB280HK. Same thing with the viewing angles. Not as good as the PB278Q, but miles better than the XB280HK.

So that’s it.

Although this is not the worlds most perfect monitor, it’s best I’ve found for the type of activities I take part it. And sure enough, there will something better on the market next year.

I’m Bored Project – Siege of Shanghai FPS and Frame Times

This one will be short and sweet. The below is a chart I recorded while playing on an empty Battlefield 4 server of Siege of Shanghai. I walked around looking at various things trying to determine how much processing power was required.

Shanghi FPS Test

The green line is the Frame Per Second (FPS) during the test. Higher is better. You want a higher frame per second score as this means the perception of motion to your eye is more believable.

The red bars are various events in the test. The first was when I was looking at a car on fire. The second was when I was looking at a building smoking after it had been on fire. The third was when the building was collapsing. The fourth is when I was staring at a wall, and fifth is when I was looking at car smoking after it had been on fire. The middle section is when I was shooting tank shells at the building. Each dip was a shot.

The blue line is the frame time during the test. I couldn’t get it lined up perfectly with the green, but it should match. That is, the spikes in the blue should line up to the dips in the green. Frame time is the amount of time the computer takes to generate a frame. You want this to be as low as possible it means the amount of frames you can generate in any given second will be higher. The frame time in the above chart spikes during demanding scenes and this directly causes a low FPS in the scene.

Here’s the fire scene:

Untitled2

Here’s the smoke:

Untitled1

Here’s the building collapsing:

Untitled3

Summer 2014 PC Update – Part 1 – A look back

The summer brings good things to the tech world. New stuff announced at CES (In January) finally starts hitting the shelves, and for those waiting 6 months, it couldn’t come any sooner. This year, I decided to upgrade my case and water cooling set-up. By default this meant that a new motherboard was also in store. Don’t you love it when you force your self into upgrading? I do!

The new case is called, Raven, and is made by Silverstone. This is the their 5th iteration of the case. All (except one) have a 90 degree rotation on their motherboard mount, leaving the GPU hanging vertically from the top rather than laying flat. This, apparently, promotes the “hot air rises” effect and is intended to allow the air to move naturally bottom-to-top. That’s not the best part of the case though. The best part is the massive 180mm fans at the bottom of the case. There are two of these fans, and their job is the maintain the bottom-to-top air current in the case. A side effect of this is that they create a positive pressure inside the case as more air in entering than leaving. This helps repel dust from settling inside the case as air is always being forced out. Here’s a shot of the RV02 (which had three 180mm fans):

RV02

Historically, all raven cases have featured the 90 degree rotated motherboard and bottom mounted 180mm fans. My current build actually is with the 3rd iteration (call it the RV03) of the raven case. Why am I so excited about this new 5th iteration (RV05) though? Two main reasons. 1. The case has been shrunken down to it’s smallest ever size. By using some clever packaging, the case has moved from a medium sized tower to a small tower. This should free up some desk space and make the tower more portable. 2. The 180mm fans now feature some extra breathing room. i.e. The footprint of the case is slightly larger than that of the fans leaving a gap between the fans and the case.

Why is point 2 such a big deal to me? With the RV03 the fans sat flush against the case, and there were two of them for a footprint of 180mm x 360mm. The RV05 has a foot print of about 182mm x 410mm. An extra 2mm of space across and 50mm of space length wise.

I’ll leave this point for a second, but will circle back.

For water-coolers, finding the right case that allows them to mount as much radiator surface area as possible is tricky. Cases are mostly designed for heat-sink coolers and thus provide limited options for mounting radiators. Often a water-cooler will take one of these cases and mount multiple radiators, but this only adds to the complexity of the system as he now has to manage the extra plumbing and provide a pump big enough to move the water though the system.

Here’s a shot at my first water cooling attempt in the RV03 case:

WCO12

You can see how the case didn’t really provide good options for mounted a nice big radiator, so I mounted two, one in each ventilation hole. This configuration begun to show it’s weaknesses when I upgraded the processor and needed to dissipate more heat. The method I used to determine the effectiveness of the cooling system is basic, but worked. I looked at the water temperature, and tried to maintain it at 40C or less. The closer to room temperature the water, the better, as the bigger the temperature differential between the water and the components, the more efficient the heat transfer. I pretty much guessed at the radiator size for the above build and got away with it. Consider myself lucky. I think this setup had a dual core i3 CPU and a GTX-670 GPU.

Here was my second attempt at a cooling system:

WCO17

The change to the cooling system was to replace the left most radiator with something bigger. I went with a 120mmx360mm sized radiator, replacing the 120mmx120mm. In theory this should have added double the cooling performance of the system as the radiator surface area doubled.

The first system having two 120mmx120mm radiators, each having a surface area of 14,400mm2, for a total of 28,800mm2. While the new system, with its one 120mmx120mm and one 120mmx360mm, has a total surface area of 57,600mm2.

In practice this I didn’t realize full potential of the system due two major pitfalls of it’s design. 1. The fans placed on the radiators take warm air form inside the case and blow it out through the radiators. Not ideal. Ideal would have fans blowing cool outside air over the radiators back into the case. But I didn’t want to cook the inside of the case so made a compromise. 2. The left most radiator only has one small 120mmx120mm opening, making the bottom 2/3’s of that radiator almost useless. It must have been doing a good enough job though, because the cooling performance did increase over the previous set-up. This system ran a quad core i5 and a GTC-770. Water temps never went above 40C.

Looking for more performance, the third attempt with this RV03 case saw the removal of the top most radiator and it’s replacement with a larger 140mmx280mm unit sitting on the bottom of the case.

900x900px-LL-4ea25c06_DSC00419

With this radiator now in place, the total surface area of the cooling system increased from 57,600mm2 to a whopping 82,400mm2. Plus, the bottom radiator was pulling in cool air from outside the case and blowing it up out the top of the case. I saw the maximum water temps decrease by a couple of degrees. This config ran a quad core i5 and a GTX-780Ti.

This picture brings us back to a point made in the 3rd paragraph. Notice how this case has two 180mm fans mounted at the bottom, but notice how the case butts up right against them. The biggest radiator I was able to fit on top of them was the 140mmx280mm you see here. This is the beauty of the RV05 case. It’s gives the 180mm fans slightly more room than they require allowing users to mount a nice and big 180mmx360mm radiator.

This is a shot from my build in progress with the new RV05 case:

900x900px-LL-8d3b65dc_IMG_20140809_171814

Look at the size of that radiator! This gets me really excited. Surface area of this beast comes in at a meaty 64,800mm2. Sure, that’s less than the set-up it’s replacing, but this one takes all of it’s air from outside of the case, not the inside.

Using the same CPU and GPU as before, water temperatures stayed pretty much the same. High 30C’s under full load. This is in the summer mind you where my house heats up to 27/28C inside. So let’s call the temperature delta about 10C. Under full load this system consumes about 400W of power, meaning the water cooling set-up has to dissipate 400W of heat. Which for a single radiator I think is pretty good.

And this brings us up to the PC’s most current configuration.

I’ll go into more detail about it in an upcoming post.

NVIDIA Driver Test with Battlefield: Hardline Beta

Tonight I was prompted to download the new NVIDIA 340.43 Beta driver. The description mentioned adding support for the recently released Battlefield: Hardline Beta. I’ve been running with the stable driver 337.88 since installing Hardline, and all has been fine. Performance has been OK really, except for some weird animations (dead bodies twitch on the floor) when people die, or when you get too close to wall (the wall turns transparent), but me being me I decided to compare the two drivers.

I’ll note, I was excited to make this comparison because of the recent 337.88 series driver. It got quite a lot of media coverage because of its 10% performance improvement over its predecessor. 340.43 most likely wont be another 10%, but I’m curious.

Click this graph for a bigger view. It’s better on the eyes!

BF Hardline FPS 337 vs 340


What’s interesting here is the lack of raw performance, but the honing in on consistency. The new driver provides more stable performance with fewer spikes. It does however, add a few big drops though. Like the one at 145 sec. Not sure what was going on in the game, but the new driver didn’t seem to like it. The previous spike at 280 seconds is gone. This was, I think, is when the crane falls. The new driver make better work out of that scene.


LEGO HTPC / Server Project (pt 3 dealing with heat)

First Run Heat Issues:

The server was initially intended to run without any fans. The CPU is/was low power and comes with a fan-less heat-sink, and the HDD’s are pretty much out in the open. Perfect, I thought, lets get this show on the road. Upon first power up it was apparent this was going to be an issue. The CPU slowly started to rise up to its 80C alarm limit, and the HDD’s quickly shot up to 47C. Ideally, the CPU should be in the mid 30’s and the HDD’s should be under 40C.

To fix the issue, the main fan was connected to the server’s motherboard. Straightforward right? nope… The motherboard is only setup to control 4-pin PWN fans, and thus blasts the fans with a constant +12V. The 3-pin fan shot right up to 3000 RPM. To lower the speed and noise, I installed a resistor inline with the fan’s power lead. This drooped the voltage to the fan to where it now sits at a nice quiet 1000 RPM. The CPU now runs around the 35C mark.

The HDD’s presented more of a challenge as the case was designed to be fan-less. I had some 40mm fan lying around, and again luckily for me, they were a perfect fit into the existing ventilation gaps. The fans were all connected to the server’s motherboard. Straightforward right? nope… The motherboard is only setup to control 4-pin PWN fans, and thus blasts the fans with a constant +12V. The 3-pin 3-pin fan shot right up to 4000 RPM. To lower the speed and noise, I connected the fans to the +5V rail off the power supply. They now run at a nice quiet 1000 RPM. The HDD’s now run around the 37C mark.

Google has published a really nice white paper on HDD failure analysis. The paper focuses on consumer grade HDD’s and operating conditions effecting their longevity. http://research.google.com/pubs/pub32774.html. This is where I’m getting my temperature target of under 40C from.


DSC00257_1


— Update —

More Heat Issues:

Although elegant and simple, the above solution did not work as planned. In trying to the make most of that situation, I ended up installing a total of seven 40mm fans into the gaps shown above. And while they did lower the drive’s temperatures, they just weren’t able to keep them below 40C. They would idle at 37C or so, but on a warm day or under load they had no trouble getting up to 40C / 41C.

Enter solution #2. The 40mm fans were originally connected to the power supply’s 5V rail in hopes that 5V would spin the fans slowly and quietly. And it did just that. They were very quiet, but ultimately ineffective. This solution was to connect them to the 12V rail in hopes that a faster fan speed would provide extra cooling. All this really did was increase the noise they produced. No noticeable change in temperature. If I had to guess why, it would be the fans’ location. They were just circulating hot air.

Enter solution #3. The 40mm fans were removed altogether. Replaced by two 120mm fans sitting external to the enclosure. This would allow them to blow cool air at the drives, and move more air than seven 40mm fans ever could.

The 40mm fans are spec’d to move about 4cfm air. Multiply that by seven and the total volume of air they were able to move was 28cfm. Now looking at the 120mm fans, they are spec’d to move about 74cfm of air each, and I have two of them, producing a total of 148cfm or about 5x the volume. I know, I know, ugly Noctua brown. But they’re what I had lying around…

Case in point:

Without any fans the drives would idle at 47C.

With four 40mm fans @ 5V the drives would idle at 38C.

With seven 40mm fans @ 5V & 12V, the drives would idle at 37C.

With two 120mm fans, the drives now idle at a cool 28C.

DSC00266_ DSC00267_